Written by Utkarsh Anand, a Personal Branding and Marketing Expert: Learn more
Creating your own Artificial Intelligence (AI) may seem complicated and technical, especially if you don’t know a programming language.
But fear not! In this in-depth guide, I will break down the process step by step. This guide will focus on beginners without requiring any coding expertise.
I have a technical background, but I have created an AI assistant without having to code and will be sharing how I did it.
By the end of this article, you’ll be amazed at how easy it is to make your own AI system.
TL;DR: What You’ll Learn Today
- Develop your AI without any coding skills.
- Understand the basics of artificial intelligence.
- Utilize user-friendly platforms for seamless AI creation.
- Train your AI with the right data for optimal results.
- Deploy and use your AI in real-world scenarios.
Ready to dive in? Let’s start this journey to demystify the world of artificial intelligence.
What is An AI Assistant?
An AI assistant is a tool powered by machine learning and natural language processing.
Some AI assistants can even perform computer vision and speech recognition.
It is exactly what it sounds like and can be leveraged like an assistant.
AI is often associated with self-driving cars, robots, and many seemingly complicated things. But you can use it for many day-to-day tasks as well.
A great example of an AI assistant is ChatGPT. It is a versatile tool by OpenAI that allows you to have human-like conversations.
While ChatGPT is a general-purpose AI assistant, what’s much more exciting is tailoring one to your personal needs.
Imagine an AI designed for your business to answer inquiries, streamline support, or handle niche tasks.
Ready to find out how? Let’s dive in!
How Does a Personal AI Assistant Work?
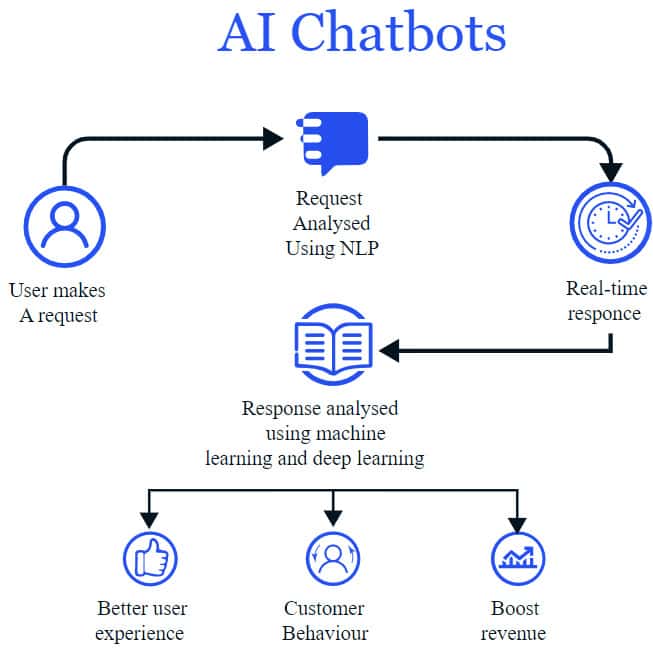
An AI assistant or a chatbot uses Natural Language Processing (NLP) to recognize your input and respond by making decisions using Machine learning.
AI is trained by providing it data much like the human brain. It learns from patterns within the data and makes decisions based on these learned patterns.
An example of such data is:
If you have a business, you can benefit by providing frequently asked questions (FAQs) and their answers or different variations of how customers might phrase certain questions.
You can then further refine your AI by analyzing its responses and further training it.
Step-By-Step Guide to Make Your Own AI
Alright, let’s dive into the fun stuff – creating your very own AI assistant!
Now, you might think you need a computer science degree for this, but you don’t.
I’m here to guide you through the process without drowning you in tech jargon.
Trust me, it’s easier than it sounds!
Step 1: Define Your AI’s Purpose
Before you get started, it’s important to have a clear vision of what you want your AI to do.
Knowing this will help you with the rest of the process.
Some of the common use cases of a custom AI are:
- Customer Care: You can train your AI to be a tool for your customers to answer general questions about your business, help them navigate your website, troubleshoot common issues, and so on.
- Task Automation: Your AI assistant can also help you automate repetitive tasks scheduling appointments, sending out correspondence, data analysis, managing to-do lists, etc.
- Personal Assistance: If you work in a specific field, let’s say law. You can train your AI with relevant information so it can provide you with more accurate information related to your field.
- Internal Knowledge Base: You can also train your AI projects to serve as a knowledge base for use within your business. You or your employees can use it to get answers to common questions.
If you know what problem you want your AI systems to solve, it will allow you to choose the best AI platform and the right data.
Step 2: Choose Your Platform
There are many platforms that can help you create custom AI assistants.
What you are looking to achieve with your AI assistant will determine what the best AI chat builder will be for you.
For the purpose of this tutorial, I wanted to create a chatbot to answer any questions visitors of my website may have.
I did some research and found a few tools that I could use to create such an AI project.
DocsBot.AI
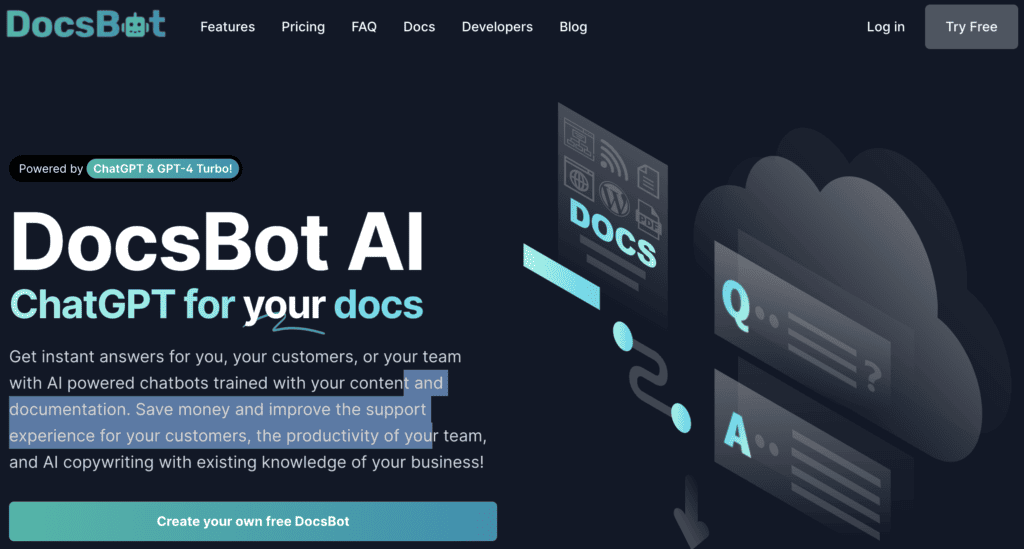
One of my favorite AI chat builders is DocsBot.ai.
I personally love the user-friendly UI and how easy it is to use.
DocsBot allows you to train AI chatbots using content from different data sources and documentation. It lets you use content in the form of documents, URLs, sitemaps, formatted CSV files, etc.
DocsBot is a GPT-based tool that allows you to create custom AI models using your own data.
For this post, I will be using DocsBot.AI to create a custom AI model to show you how easy this process is! We won’t be focussing on computer vision or speech recognition and will be creating a text-based AI assistant.
Step 3: Train Your AI Assistant With Data
Once you have selected the platform you want to use, it is time for you to train your AI so it aligns with your brand identity.
You need to provide data for your chatbot to learn about your product or brand.
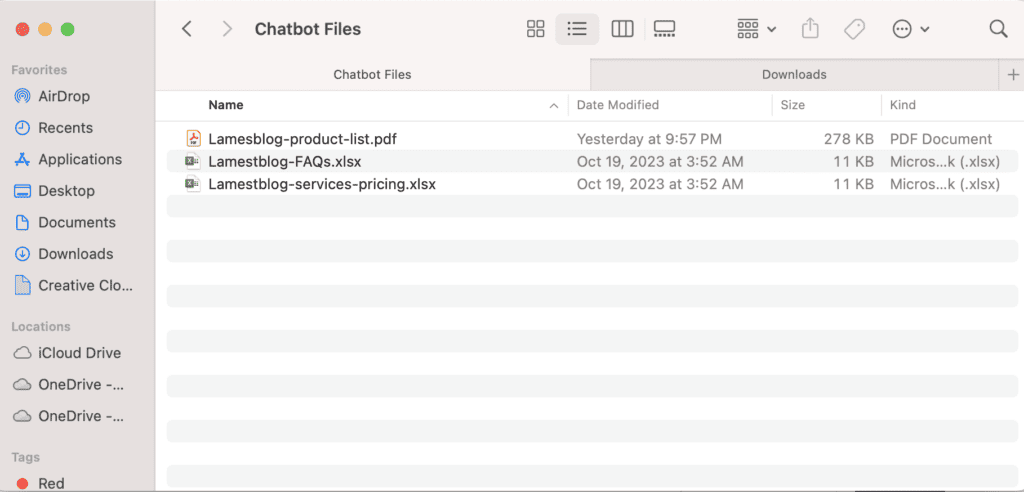
For my chatbot, I provided a sitemap of my website, some documentation I have created explaining different aspects of my website, and a CSV file containing FAQs.
Providing DocsBot Your Data
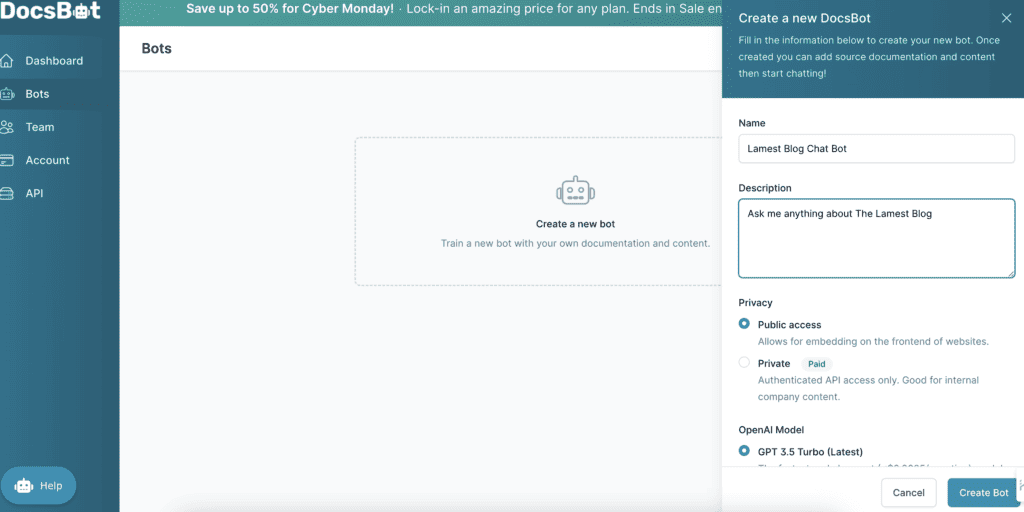
Once you have created your DocsBot account, you can start creating your bot by adding a name and description. Then pick the privacy and OpenAI model you want, as you can see above.
Next, click on “Create Bot”.
Docsbot allows you to use many different content sources. I picked documents, a sitemap, and raw data (CSV file).
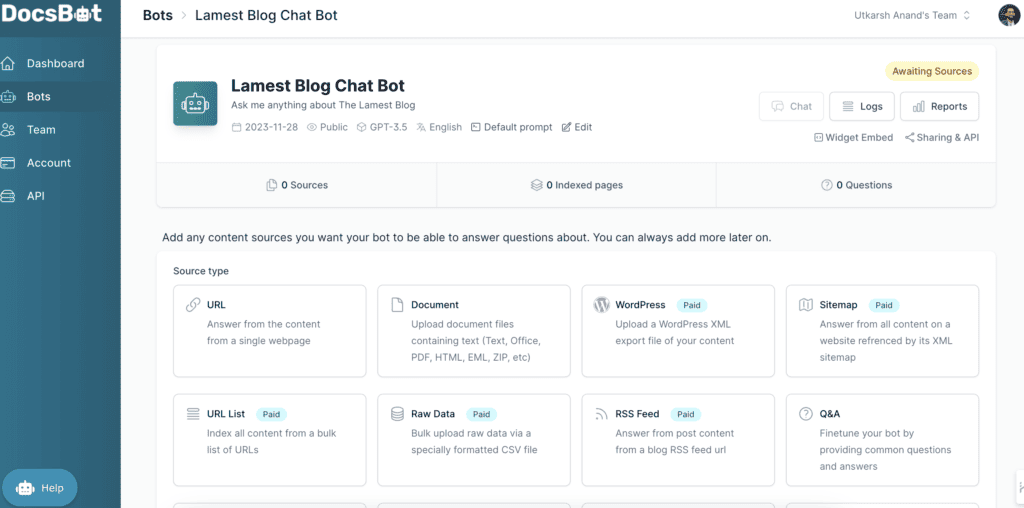
As you can see above, sitemap and raw data are only available in the paid version.
But, what’s cool about DocsBot is that it lets you create a chatbot for free using documents and URLs.
How To Prepare Your Data for DocsBot
DocsBot uses OpenAI’s GPT models to create your chatbot.
GPT has amazing natural language processing capabilities which means it can understand text.
However, it is best to structure your content in a way that is easy for the model to understand.
For my chatbot, I considered the following:
- Use descriptive names for my documents.
- Provide tables in JSON or XML format.
- Ensure the information provided is as complete as possible.
Step 4: Refine Your AI Using Prompt Engineering
A custom AI model is trained on a vast amount of diverse data and then fine-tuned for a particular task.
As mentioned above, DocsBot uses OpenAI’s AI models which are trained on tons of data which can cause your chatbot to respond to queries outside your data set.
For example, my website is about business and marketing and I offer certain marketing services. If someone inquires about the pricing of a service I don’t offer, the chatbot may find some information on a similar service in GPT’s data set and respond.
For such cases, I should prepare my AI to not use GPT’s data. You can do this by using a base prompt.
A base prompt is a prompt that will added to every query a user makes.
An example of a base prompt is:
“Your name is “Lamest Blog Assistant”. I want you to respond to queries with answers from the content I have provided you. I want you to use a tone similar to the content to match our brand voice. If the query covers something that isn’t in the provided content, say “Sorry, I don’t have the answer to your query. But I can provide you with information related to the Lamest Blog”. Don’t answer any questions with information outside of the content.”
You need to be extremely specific about what behavior you want from your chatbot. You can even refine your base prompt as you go.
Your base prompt is extremely crucial when it comes to maintaining standards and staying consistent with your brand.
Test different scenarios and update the base prompt accordingly.
Step 5: Test, Test, Test
Just like any AI solution, testing your chatbot is crucial. Again, it may sound daunting but you don’t need to be a data science expert to test your AI.
I tested my chatbot with a bunch of different scenarios to make sure that it is behaving as expected.
Are you not sure what scenarios you want to test? Don’t worry, I struggled with this too.
Here’s what I did. I used ChatGPT to come up with different test cases to test my chatbot.
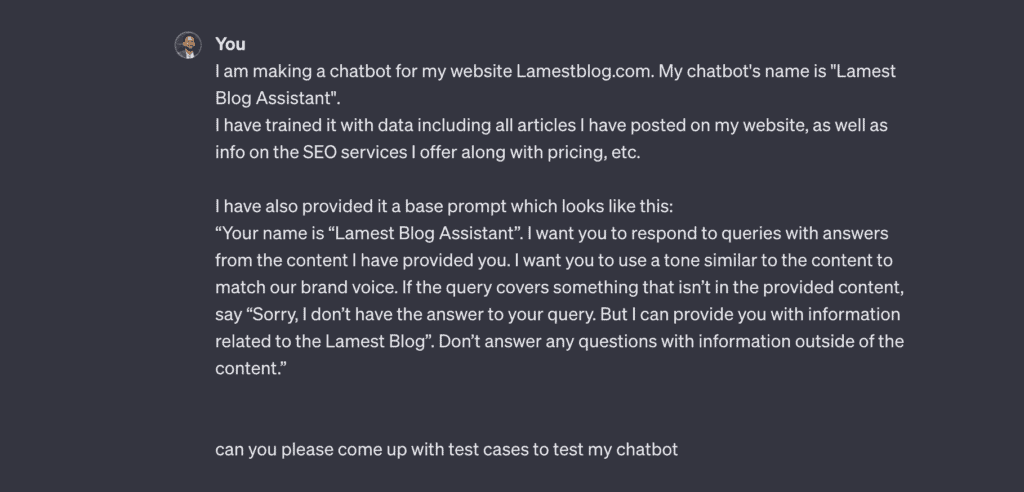
As you can see above, I asked ChatGPT to give me some test cases and this is what it came up with:
- General Queries:
- Input: “What is Lamest Blog about?”
- Expected Output: Response providing a brief overview of the blog’s content.
- Article Specific Query:
- Input: “Can you tell me about the latest article on your blog?”
- Expected Output: Summary or information about the most recent article.
- SEO Services Inquiry:
- Input: “Tell me about your SEO services and pricing.”
- Expected Output: Detailed information about the SEO services offered along with pricing details.
- Specific Article Search:
- Input: “Find an article about content marketing.”
- Expected Output: Response with information or link to an article related to content marketing.
- Pricing Query:
- Input: “How much does your basic SEO package cost?”
- Expected Output: Clear information about the pricing for the basic SEO package.
- Invalid Query:
- Input: “What is the capital of France?”
- Expected Output: “Sorry, I don’t have the answer to your query. But I can provide you with information related to the Lamest Blog.”
- Tone and Brand Voice:
- Input: “Tell me a joke.”
- Expected Output: A response in a tone similar to the brand voice, possibly incorporating humor related to the blog’s content.
- Query Outside Content:
- Input: “Who won the Nobel Prize in Physics in 2020?”
- Expected Output: “Sorry, I don’t have the answer to your query. But I can provide you with information related to the Lamest Blog.”
- Service Customization Query:
- Input: “Can I customize the SEO services to fit my specific needs?”
- Expected Output: Information about the flexibility or customization options available for SEO services.
- Feedback Query:
- Input: “What do people say about your blog?”
- Expected Output: Responses showcasing positive feedback or testimonials from readers.
This is a great start but obviously, you don’t want your tests to be limited to this.
You can come up with more test cases to cover different aspects of your chatbot based on the information you have used to train it. But if you are stuck, tools like ChatGPT can help you get more ideas.
Step 6: Integration with Your Platforms & Deployment
Once, you are happy with your chatbot the final step is to integrate it with your website.
DocsBot also allows you to easily customize the look of your chatbot.
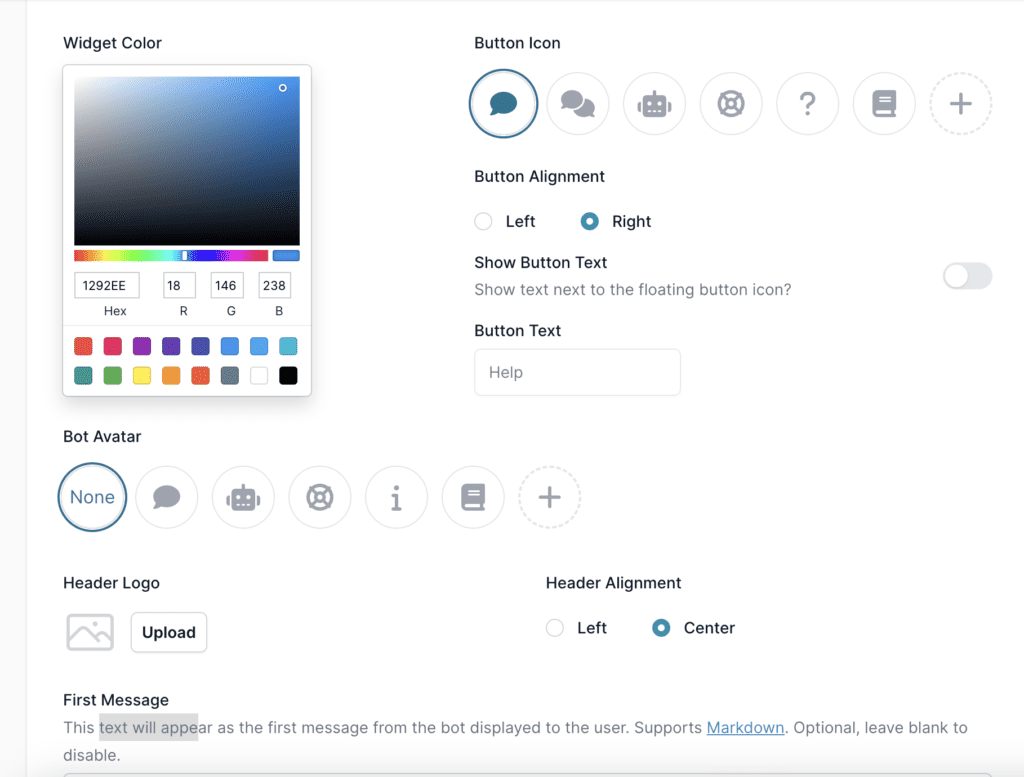
You can add a Header logo, the first message, a button icon change the color scheme, etc.
DocBot allows you to easily integrate your chatbot with your website in a few simple steps.
You can start by selecting your bot from the dashboard and clicking on “Widget Embed”
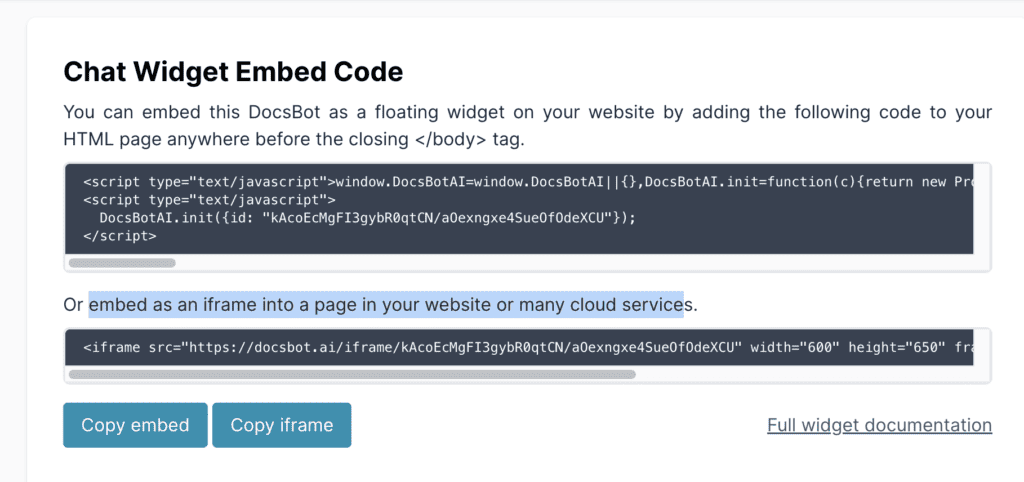
As you can see in the image above, there are two different ways for you to do so:
Floating Widget On Website
You can copy the code from DocsBot and paste it on your HTML page anywhere before the closing </body> tag.
This will make your chatbot available throughout your website as a floating widget that visitors can interact with.
iFrame
You can also embed the chatbot as an iFrame into a page on your website.
What Do You Need to Know Before Building an AI?
You may think that you need to be an expert in AI technologies and deep learning to build an AI of your own. But it’s much easier than that.
Almost anyone who can use a computer can create their own AI assistant using AI platforms like DocsBot.
Although these AI platforms are built by machine learning engineers and professionals, using these platforms is pretty straightforward.
They are making AI technology accessible to everyone and making programming AI tools a breeze.
Additional Consideration When Building an AI
In addition to the steps above, there are a few other things to keep in mind when creating your own AI assistant:
- Data privacy and security: Make sure your AI assistant is compliant with data privacy regulations, such as GDPR and CCPA.
- Bias and fairness: Be aware of potential biases in your data and take steps to mitigate them.
- Human oversight: It’s important to have human oversight for your AI assistant to ensure that it is performing as expected and not causing any harm.
Benefits Of Making Your Own AI Assistant
The benefits of your personal AI assistant extend beyond convenience, offering a deeper level of customization and control.
Let’s look into the advantages of making your personalized AI assistant.
- Tailored to Your Needs: Creating your own AI assistant allows you to tailor its functionalities according to your specific requirements.
- Privacy and Security: Concerned about your data privacy? When you build your AI assistant, you have control over the data it processes. This means you can implement robust security measures and decide how and where your information is stored.
- Flexibility and Continuous Improvement: Your AI assistant is a work in progress. You can continually refine and enhance its capabilities based on your evolving needs.
Final Thoughts
Creating an AI can sound like it’s a task only for data scientists and engineers but with modern technology it has become a lot easier for anyone to make their own assistant.
In this tutorial, we went through the process of creating a personal AI assistant using an AI platform.
Using a platform like DocsBot allows anyone to create a chatbot easily.
It is a great tool and can be extremely useful for most individuals and businesses. However, it is confined to a chat interface and can’t actually carry out tasks outside of the chat.
If you want a tool that can conduct more complicated tasks you still need to have some knowledge of Machine learning and data science.


